Monday, 30 May 2016
Dutch Girl Dinners: Easy Sausage Rolls
Dutch Girl Dinners: Easy Sausage Rolls: I have always liked the British version of a good sausage roll, they make a great snack, or the basis of a lunch with soup or salad, and of ...
Easy Sausage Rolls
I have always liked the British version of a good sausage roll, they make a great snack, or the basis of a lunch with soup or salad, and of course make great hors'd'oeuvres!
Begin by defrosting a sheet of puff pastry, from the grocers frozen aisle, it takes about 2 hours in fridge or 30 minutes on the counter, but make sure you cover it well to keep it from drying out. Preheat your oven to 375 degrees F. Use a sheet pan covered in parchment paper
The best sausage to use in this is Oktoberfest, mild Italian, or pure pork sausage, you must remove the casing, keeping the shape of the sausage intact, it is easier if the sausage is very cold or partially frozen. Use your kitchen shears to cut a little way down the casing, then peel it off the rest of the way. Set aside.
Once the puff pastry is ready to roll out a little, just enough to make it smooth, and easier to handle, flour just the rolling pin, if it sticks use just a little on the pastry itself. Once you have rolled it out a bit, it will be bigger by an inch or two on all sides, take two or three sausages, set out in a line edges touching, on top of the short edge of the pastry, then roll pastry and sausage over until the pastry covers the sausage with 1/4 inch overlap, cut down through the sheet of puff pastry there, then with a pastry brush and a little cream, brush the inside seam of the long sausage roll, pinch edges together, then with a very sharp serrated knife, cut the long sausage roll into 2.5 cm or 1" pieces, making sure that sausage is showing at each end of the little sausage roll. Continue in this way until you have used up your sausages, or pastry or both. fill the sheet pan covered with parchment or silpat, with the 1 inch sausage rolls,seam side down, leaving an inch all around each for the pastry to puff up. Put pan in fridge for 30-45 minutes, keeping the puff pastry cold will make the pastry puff into double its thickness due to the reaction of steam from the ovenheat/butter in the pastry. Once everything is very cold, brush each sausage roll with a little cream, then put into preheated 375 degree F oven for about 20-25 minutes. Enjoy!

Dutch Girl Dinners: Better than store bought Salad Dressings
Dutch Girl Dinners: Better than store bought Salad Dressings: Last year, in one of Ray's travels, he brought home a bottle of very delicious garlicky oil and vinegar dressing, everyone loved it, inc...
Better than store bought Salad Dressings
Last year, in one of Ray's travels, he brought home a bottle of very delicious garlicky oil and vinegar dressing, everyone loved it, including me, but all good things end, so did this great dressing. But I figured out how to make a salad dressing just as good or even better than the one in the bottle, in fact I used the same bottle, filling it with my own version, no one could tell the difference....Note: just know that if you use Olive oil, then refridgerate left overs, the oil solidifies, just be sure to take left over dressing out at least an hour before using it, to bring the oil back to liquid.

 Easy Salad Dressing
Makes 3-1/2 cups
3/4 cups apple cider vinegar
1/2 teaspoon salt
Cracked black pepper
4 cloves fresh garlic, minced with garlic press
1 tablespoon grainy mustard
2 tablespoons honey
1-1/4 cup vegetable oil
In a quart sized mason jar with a close fitting lid, measure in all ingredients, tightly close the jar, shake until ingredients are thoroughly mixed. Let stand for 20 minutes to meld flavours together, shake again, then taste for seasoning, here you can adjust for more vinegar or oil, making sure it it more or less 45% vinegar to oil, adding more salt or cracked pepper.
The very best and really only way to test if your salad dressing is right is to pour it on a few varieties of lettuce leaves, then you know if you have the correct acid to oil ratio.
Another great Olive oil Salad Dressing
1/2 cup red or white wine, or white balsamic vinegar
1 teaspoon Dijon mustard
1/2 teaspoon minced garlic
1/2-3/4 teaspoon salt
1/4 teaspoon cracked black pepper
1 teaspoon honey (optional)
3/4-1 cup extra virgin olive oil
A pinch of hot pepper flakes, or a few torn leaves of fresh thyme, or basil, optional
Measure all ingredients into a 2 cup mason jar, close lid tightly, shake thoroughly, let stand for a while, shake again, then taste for seasoning. I have left you the choice of vinegars and with that choice, depending on the sweetness of the vinegar, to add a bit of honey or not. this is the basis of many flavours that you can add, including hot peppers, fresh basil, fresh thyme, or any other fresh herb in season. This dressing is great on a variety of leafy lettuce including romaine. I often add curls of Parmesan to this salad, just to give it a bit more earthy saltiness, the umami, if you will.
Caesar Dressing
3/4 cup white wine vinegar
3-4 oil cured anchovies, smashed with mortar and pestle
2-3 cloves of garlic, also smashed with mortar and pestle
1 teaspoon salt
1/2 teaspoon pepper
1-1/2 cups olive oil
1 tablespoon grated Parmesan cheese
Using you mortar and pestle, or a small grinder, toss in the anchovies, garlic, salt, and a tablespoon or so of the olive oil, smash/ grind with the pestle until a paste forms, scrape out into a quart size mason jar, add the rest of the ingredients, including the grated Parmesan cheese, tightly close the jar, shake well, let stand for 30 minutes, shake again, then taste on a piece of romaine lettuce. Adjust for pepper, add more parmesan cheese to the finished salad.
Don't like anchovies? Use bacon bits to achieve the same sort of salty/smoky flavour.
Wednesday, 4 May 2016
Dutch Girl Dinners: Mieke's Chili con Carne
Dutch Girl Dinners: Mieke's Chili con Carne: I know everyone has their favourite version of Chili...it is one of those versatile recipes that you can do a lot with. Have you ever mixed ...
Mieke's Chili con Carne
I know everyone has their favourite version of Chili...it is one of those versatile recipes that you can do a lot with. Have you ever mixed your chili with homemade macaroni and cheese? Or had coney fries...well done French fries topped with 1-1/2 cups hot chili, then topped with grated smoked cheddar...how about chili enchilada bake? Or chili nachos, with lots of cheese, jalapeños, and hot cheese sauce? dont forget chili dogs with lots of fresh green onion and a bit of shredded cheddar! See, lots of things to do with one recipe of chili, besides there is nothing as satisfying as a bowl of chili on a cold day.....so comforting.
Note:
I use medium ground beef because it has lots of flavour, you will pour off the accumulated fat, reserving one or two tablespoons to sauté the vegetables in this recipe. If you use Ancho chili powder, it gives the chili a deeper flavour, but chipotle chili powder gives it a Tex-mex smoky flavour.
 Mieke's Chili
1-1/2 pounds medium ground beef
2 medium yellow or white onions,chopped med. dice
1 large yellow pepper,Chopped med. dice
1/2 red or green pepper, chopped med. dice
1 jalapeño pepper, deseeded, Finely chopped(keep the seeds in if you want it hotter)
1 teaspoon Salt and 1/4 teaspoon black pepper
3-4 tablespoons chili powder
1 tablespoon ancho chili powder, or chipotle chili powder
Pinch or two of crushed chilies
1/2 tablespoon onion powder
1 teaspoon garlic, fresh or granulated
2 tablespoons dried Mexican Oregano
2-3 medium fresh tomatoes chopped
1 tablespoon white wine vinegar
1-28 ounce San Marzano tomatoes, diced with juice
1-14 ounce can Aurora brand diced tomatoes (or if you made my Mexican tomato sauce in the fall, use 1 jar)
1-8 ounce can tomato sauce (hunts)
1-14 ounce can of water
Beans and Corn
1-20 ounce can Romano beans, drained and rinsed
1-14 ounce cans beans in Tomato sauce, (you can use a can of chipotle flavoured beans but only use 1)
1 cup frozen corn
Brown the ground beef in a large 10-12 quart pot (a large Dutch oven will do), brown over medium high heat until all the pink has been cooked out, drain the meat, reserving 1/4 cup of the fat, (pour the rest in the recycling bin), remove meat from pot, set aside, add all of the onion, peppers, fresh garlic if using with 2-3 tablespoons of the reserved fat, sauté until softened 2-3 minutes, stirring all the while, add the meat, stir to combine, add the salt and pepper, the chili powders, the oregano, the onion powder and garlic powder if using, stir well, sauté until all spices are incorporated and it is fragrant, then add the fresh tomatoes, stir well, then add the vinegar, and the rest of the tomato products and the can of water, stir well, bring it to boil, stirring let it boil a minute, then turn it down to let it simmer for 20 minutes, stirring occasionally. Now you can add the beans, stirring well, let simmer for 30-40 more minutes, then turn it off and let it rest to mingle the flavours, check for salt and pepper, add to taste. Chili is really better the next day, but you can eat it same day but it will be spicy! When ready to serve, heat gently, add the cilantro to each bowl, if using, accompany each bowl with slices of avocados, shredded cheddar or smoked cheddar, some sour cream and a sprinkle of sliced green or red onion, Enjoy, prepare for a treat
Note:
I use medium ground beef because it has lots of flavour, you will pour off the accumulated fat, reserving one or two tablespoons to sauté the vegetables in this recipe. If you use Ancho chili powder, it gives the chili a deeper flavour, but chipotle chili powder gives it a Tex-mex smoky flavour.

1-1/2 pounds medium ground beef
2 medium yellow or white onions,chopped med. dice
1 large yellow pepper,Chopped med. dice
1/2 red or green pepper, chopped med. dice
1 jalapeño pepper, deseeded, Finely chopped(keep the seeds in if you want it hotter)
1 teaspoon Salt and 1/4 teaspoon black pepper
3-4 tablespoons chili powder
1 tablespoon ancho chili powder, or chipotle chili powder
Pinch or two of crushed chilies
1/2 tablespoon onion powder
1 teaspoon garlic, fresh or granulated
2 tablespoons dried Mexican Oregano
2-3 medium fresh tomatoes chopped
1 tablespoon white wine vinegar
1-28 ounce San Marzano tomatoes, diced with juice
1-14 ounce can Aurora brand diced tomatoes (or if you made my Mexican tomato sauce in the fall, use 1 jar)
1-8 ounce can tomato sauce (hunts)
1-14 ounce can of water
Beans and Corn
1-20 ounce can Romano beans, drained and rinsed
1-14 ounce cans beans in Tomato sauce, (you can use a can of chipotle flavoured beans but only use 1)
1 cup frozen corn
Brown the ground beef in a large 10-12 quart pot (a large Dutch oven will do), brown over medium high heat until all the pink has been cooked out, drain the meat, reserving 1/4 cup of the fat, (pour the rest in the recycling bin), remove meat from pot, set aside, add all of the onion, peppers, fresh garlic if using with 2-3 tablespoons of the reserved fat, sauté until softened 2-3 minutes, stirring all the while, add the meat, stir to combine, add the salt and pepper, the chili powders, the oregano, the onion powder and garlic powder if using, stir well, sauté until all spices are incorporated and it is fragrant, then add the fresh tomatoes, stir well, then add the vinegar, and the rest of the tomato products and the can of water, stir well, bring it to boil, stirring let it boil a minute, then turn it down to let it simmer for 20 minutes, stirring occasionally. Now you can add the beans, stirring well, let simmer for 30-40 more minutes, then turn it off and let it rest to mingle the flavours, check for salt and pepper, add to taste. Chili is really better the next day, but you can eat it same day but it will be spicy! When ready to serve, heat gently, add the cilantro to each bowl, if using, accompany each bowl with slices of avocados, shredded cheddar or smoked cheddar, some sour cream and a sprinkle of sliced green or red onion, Enjoy, prepare for a treat
Tuesday, 3 May 2016
Decadent Chocolate Pudding
I know it is so easy to purchase pudding, but homemade Pudding is fantastic, relatively easy to do, and made very heavenly with the best bittersweet chocolate, whichever brand you prefer.

Makes 8 servings (4 cups)
Ingredients
4 ounces good quality bittersweet chocolate, Lindt, or your preference
3 tablespoons Dutch cocoa powder
3 tablespoons cornstarch
1/4 teaspoon salt
1 cup heavy cream/ or half and half
3 large egg yolks
2 1/2 cups whole or 2% milk, or evaporated milk and 1 cup 2%
1/2 cup sugar
1 teaspoon real vanilla extract
Instructions
Chop the chocolate: Use a serrated knife to chop the chocolate into fine flakes. Set aside.
Make the slurry: In a large heatproof bowl,or 4 cup glass measuring cup, whisk together the cocoa powder, cornstarch, and salt. Slowly whisk in the cream, a little at a time, until you have a smooth mixture.
Separate eggs, (freeze the egg whites for an easy summer pavlova)Whisk the eggs into the cream and cornstarch mixture.
Combine the 2-1/2 cups milk and 1/2 cup sugar, into a 3-quart (or larger) saucepan. Add the sugar and warm over medium heat, stirring frequently, until the sugar is dissolved. (You can also heat the milk and sugar in a glass measuring cup in the microwave), it is quicker, but you still have to use the saucepan to cook the entire mixture til it thickens. Bring milk mixture to a light simmer over medium heat. Watch for the surface of the milk to vibrate and for bubbles to form around the edges of the pot.
Then:
Pour most of the hot milk slowly into the glass measuring cup holding the cream, cocoa, corn starch and egg yolks slurry/mixture, whisking until well-combined, then pour everything back into the pot. Warm the combined pudding mixture over medium-high heat, stirring frequently, until it comes to a full boil. (It should look like lava boiling up) At this point, the pudding will be much thicker, turn heat down to medium or low( depending on gas or electric stove) Cook and stir the pudding for 2 minutes, whisking constantly and vigorously. Get your whisk into all sides around the pot.
Now remove the pudding from the heat and stir in the vanilla. Then add the chopped chocolate and let sit for 1 to 2 minutes or until melted. Whisk vigorously until the chocolate is fully incorporated. you may wish to strain the mixture for silky smooth pudding, recommended if you are going to make this pudding into mousse(for mousse-fold cooled cooked pudding to 3 cups whipped heavy cream).
Chill the pudding: Spread the pudding inTo individual cups or a covered glass measuring cup,press plastic wrap or wax paper directly onto the surface of the pudding. Cover with a lid and chill. Will be good in fridge for 3 days, if it lasts that long!
Notes about the milk
Choosing Milk: I specify whole or 2% milk, or evaporated whole milk. Anything lighter and you run the risk of a too-thin pudding.
Dairy Alternatives: I don't recommend using soy, almond, or coconut milks in cornstarch puddings like this one. Alternative dairies often don't boil well; they separate or don't thicken like cow's milk. Also, regardless of the milk, the cream is important. If you want a dairy-free pudding, I recommend panna cotta instead.
Egg-free Pudding: This pudding can be made without egg yolks by increasing the cornstarch; it just won't be quite as thick and rich. If making without egg yolks, add an additional 1 tablespoon of cornstarch, and be sure to use whole milk.
Put the Lime with the Coconut Loaf
This lime and coconut loaf, quick bread is great, really refreshing for spring! Very easy to put together, you don't even need to use the stand mixer, just mix the wet and dry ingredients with a whisk, before mixing wet and dry together. If you over mix, the bread will not be tender, because the gluten in the flour will have over-developed.

2 eggs
1 1/4 cups milk (I used whole milk)
1 tsp. vanilla extract
Grated zest from 2 1/2 limes
2 1/2 cups all-purpose flour
1 1/2 cups sweetened flaked coconut
1 cup sugar
2 tsp. baking powder
1/2 tsp. Lemon extract
1/4 tsp. salt
6 tablespoons unsalted butter, melted and cooled
For the Lime Glaze
1 cup confectioners sugar
2-3 tablespoons fresh lime juice
Grated zest from 1/2 lime
 Instructions
Pre-heat your oven to 350 degrees. Coat a 9 X 5-inch loaf pan with non-stick cooking spray Or line with parchment paper and set aside.
In a small bowl, whisk together the eggs, milk, vanilla and lemon extract and lime zest. Set aside.
In an 8 cup bowl combine the flour, coconut, sugar, baking powder,and salt; pour in the egg mixture and mix until just combined. Then add the melted butter and mix until just incorporated, being careful not to over mix the batter.
Pour the batter into your prepared loaf pan and transfer it to your pre-heated oven. Bake for 60-75 minutes, or until a toothpick inserted into the center comes out clean. Remove from the oven and allow the bread to cool in it’s loaf pan for about 10 minutes before turning it out onto a wire rack to continue cooling.
Once the bread is cooled, make the lime glaze. In a small bowl, whisk together the confectioners sugar and the lime juice, starting with 2 tablespoons of lime juice and adding more as necessary to thin the glaze out to your desired consistency. Drizzle the glaze over the bread. Sprinkle with the lime zest. Slice and enjoy!
This coconut-lime bread can be stored in an airtight container at room temperature for 2-3 days.

2 eggs
1 1/4 cups milk (I used whole milk)
1 tsp. vanilla extract
Grated zest from 2 1/2 limes
2 1/2 cups all-purpose flour
1 1/2 cups sweetened flaked coconut
1 cup sugar
2 tsp. baking powder
1/2 tsp. Lemon extract
1/4 tsp. salt
6 tablespoons unsalted butter, melted and cooled
For the Lime Glaze
1 cup confectioners sugar
2-3 tablespoons fresh lime juice
Grated zest from 1/2 lime
Pre-heat your oven to 350 degrees. Coat a 9 X 5-inch loaf pan with non-stick cooking spray Or line with parchment paper and set aside.
In a small bowl, whisk together the eggs, milk, vanilla and lemon extract and lime zest. Set aside.
In an 8 cup bowl combine the flour, coconut, sugar, baking powder,and salt; pour in the egg mixture and mix until just combined. Then add the melted butter and mix until just incorporated, being careful not to over mix the batter.
Pour the batter into your prepared loaf pan and transfer it to your pre-heated oven. Bake for 60-75 minutes, or until a toothpick inserted into the center comes out clean. Remove from the oven and allow the bread to cool in it’s loaf pan for about 10 minutes before turning it out onto a wire rack to continue cooling.
Once the bread is cooled, make the lime glaze. In a small bowl, whisk together the confectioners sugar and the lime juice, starting with 2 tablespoons of lime juice and adding more as necessary to thin the glaze out to your desired consistency. Drizzle the glaze over the bread. Sprinkle with the lime zest. Slice and enjoy!
This coconut-lime bread can be stored in an airtight container at room temperature for 2-3 days.
Tuesday, 19 April 2016
Delicious Dutch Girl Pizza
Pizza can be really easy to make, even on a weeknight, all it takes is a little pre planning and voila, pizza night is any night without paying exorbitant prices to the franchises. Preheat oven to 385 degrees F for convection oven or 400 degrees F for regular oven, baking time varies, depending on the number of ingredients. If you make a basic cheese pizza, it could be ready as quickly as 20 minutes. makes enough for 3 extra large pizzas, dough and sauce are easily frozen, defrost overnight in fridge, or dough will last a week if refridgerated, but in any case ready anytime you're in the mood!

Pizza Dough
7 cups all purpose flour
Or
5 cups all purpose flour
2 cups semolina flour (get it at the bulk barn)
1 tablespoon salt
1 tablespoon bakers yeast
1 teaspoon sugar
4 tablespoons extra virgin olive oil
2-1/2 cups warm water 105 degrees (warm but not hot)
In a large bowl or (special for raising dough) 4-6 litre container with lid, add all of the dry ingredients, whisk them all together, make a well in centre, add the olive oil, then the warm water, then with the straight end of a wooden spoon mix all together until it starts to stick together and you can't stir it with the handle any longer, clear the handle of the spoon of any dough, then with clean hands start to mix and knead the dough, until the dough is smooth about 5-7 minutes, pat until it is a round ball. Clean the mixing bowl or container of flour residue, dry well, then pour a little extra virgin olive oil in, swirling it around to coat the bowl/container, add the dough, turn over a couple of times to coat dough with the oil, cover the bowl with plastic wrap, or the container with the lid let stand in a warm place until the dough doubles in size, or when poked with a finger the indentation takes a while to pop out, or it will smell yeasty and will be puffy making air bubbles that look popped. Punch down, then shape into 1 pound balls, wrap in plastic wrap and put into zip locks into fridge or freezer for another day or prepare right away-instructions below.
Pizza sauce
2-3 tablespoons olive oil
1 white onion, chopped fine
2-3 garlic cloves chopped fine
1-28 ounce can ground tomatoes
3-4 chopped fresh tomatoes
Salt and pepper to taste
1 teaspoon each, basil, thyme, oregano
Pinch crushed chillies
While dough is rising, prepare the sauce. Heat oil in a 2 quart sauce pan, add onions, sauté until soft, add garlic, sauté for another 2 minutes, then add the ground tomatoes, fresh chopped tomatoes, and the herbs and spices, salt and pepper to taste, bring to boil for about 3 minutes, stirring well occasionally, turn heat down, then simmer for 30-40 minutes, add a little water if it gets too thick, check for seasoning, turn off heat, set aside.
Putting it together
When you are ready to shape the pizza dough into your desired shape or onto a pizza pan, best to use your hands, letting the dough rest a couple of times to allow easy stretching of the dough shaping it to either large or individual sizes, cover dough with the cooled pizza sauce up to the edges,using the back of the spoon to spread out and then add layer of Parmesan cheese,covering dough and sauce evenly before other ingredients are placed on the pizza, sprinkle with more oregano if you like.
Toppings
Other toppings could include: a layer of lightly sautéed (not completely cooked) and well drained: onions,mushrooms,red or green peppers; sliced green or black olives, thinly sliced fresh tomatoes,(for marguerite pizza) or thinly sliced pepperoni, pre-cooked Italian sausage, pre-cooked ground beef, or let your taste buds dictate, even making a white pizza with broccoli, artichokes, cheesey Alfredo sauce!
Once you have topped your pizza with ingredients of your choice, cover with a layer of shredded mozzerella cheese or mixture of shredded Asiago, white cheddar, mozzerella. Then cover with plastic wrap and let rise for 20 minutes, you will see the edges of the crust become puffy, take the plastic cover off, bake at 385 degrees F convection or 400 degree F regular oven for 20-25 minutes, longer if pizza is fully loaded, cheese should be bubbly and golden, crust bottom should come up from the pan easily and be golden. enjoy your creation! Shown is mushroom and onion pizza.
Mieke's Lasagna
I used to make lasagna regularly, it tastes good, it freezes well, and it's a great dish for lots of company, with a salad, perfect meal!

It starts with a good meaty boulognaise, (meat sauce), I also use lasagna noodles that cook in the oven, which means that your sauce needs to be loose, not watery but more saucy than you would use for spaghetti with meat sauce. The cheesy layer I usually use ricotta, but recently I used a dry cottage cheese, which I processed to sauce consistency with a bit of milk, turned out perfectly, but here you can add spinach to enrich your lasagna and hide a bit more vegetable goodness for those who don't like to eat plain veggies. This boulognaise recipe makes a lot, but it is for a double recipe of lasagna(I use my stainless steel roasting pan), if you don't want that much lasagna, freeze half of the sauce for a spaghetti dinner, and cut the cheese layer ingredients in half. Preheat Oven 350 degrees F, cooking time 1-1/2 hours.
Boulognaise
1-1/2 pounds lean ground meat
1 pound ground Italian sausage meat, (casing removed if using sausages)
2 yellow onions, chopped medium fine
1 medium carrot, shredded
1 stalk celery, chopped fine
4 garlic cloves, chopped fine
6 chopped fresh tomatoes
3 tablespoons tomato paste
2-28 ounce cans diced tomatoes
1-28 ounce can ground tomatoes
Approx. 1 liter of water
2 beef boullion cubes
1/2 tablespoon each, dried basil, oregano, black pepper
1 teaspoon salt, or more to taste
1/2 teaspoon hot pepper flakes (optional)
1/2 teaspoon granulated garlic powder
Brown the meat in a large 6-8 quart Dutch oven, when the meat has lost its pinkness, drain most of the fat, set meat aside, use 2 tablespoons of the drained fat to sauté onions, celery, carrot, when those are soft, add garlic when you can smell the garlic, add the chopped fresh tomatoes, and the tomato paste, sauté them for a couple of minutes, then add all of the canned tomatoes, with some water rinse the cans holding the tomatoes, at least a couple of cups to start, add the boullion cubes, bring all to a boil, add back the meat, add the dry seasoning, taste for salt, being careful not to add too much, add the granulated garlic, and hot pepper flakes, if using, stir well, turn heat down, simmer the sauce, checking for seasoning for about 40 minutes.
Cheese Layer
1 litre of ricotta
4 eggs, beaten
4 ounces of shredded Parmesan
6 ounces of frozen chopped spinach, defrosted, squeezed dry
1/2 teaspoon salt, grated nutmeg
1/4 teaspoon black pepper
Mix all ingredients together, set aside.
12-16 dry lasagna noodles
12-16 ounces shredded white cheese, I use a mixture of Romano,Asiago, mozzarella, white cheddar, but you can use just Romano and mozzerella.
Putting it all together:
Layer of sauce (without meat) covering the bottom of the baking dish, layer of noodles, lots of sauce then some shredded cheese, another layer of noodles, then using all of the Cheese mixture, spread evenly, another layer of noodles, lots of sauce and then shredded cheese, then another layer of noodles finish with lots of sauce, then bake in oven 350 degrees F for about an hour, check the tenderness of the noodles, add more sauce if needed, then add a layer of shredded cheese mixture, bake for another 20-30 minutes until all is bubbly and cheese on top becomes golden brown. Don't add the last shredded cheese layer for the first part of baking as it becomes too well done and rubbery. Enjoy!
Friday, 11 March 2016
Spinach and Feta Phylo Trangles
Spinach is a great and versatile ingredient, can be used in a variety of ways, and is good for you. This recipe is one I made up on the fly, as I had a package of Phylo pastry, and 1/2 a bag of frozen spinach.
 Morning
Take out the frozen ingredients, to defrost for assembly later for dinner
1 package of Phylo pastry defrosted in the fridge
2 cups frozen spinach, set out in colander to defrost
The spinach needs to be fully defrosted and squeezed dry. Remove the Phylo dough when you are ready to assemble the pies. Preheat oven to 375 degrees F
Filling
2 eggs, beaten
1/2 cup cream cheese
2/3 cup feta cheese, chopped if it comes in a block
3/4 cup Parmesan cheese
1/2 white onion, chopped
1/2 tsp nutmeg
Pinch of dried mint
Spinach, Defrosted and squeezed very dry
Cook the onion in the microwave for 1 minute with a tiny bit of water, drain then add to the other ingredients. Mix all ingredients well, add a little black pepper, it should be salty enough with the cheese, set aside
1/2 cup unsalted butter, melted
For each spinach triangle you will brush melted butter on each of 4 sheets 8"x11" of Phylo dough, placing one on top of another cut the prepared Phylo sheets in half down the short side, then in half again, you should then have 4 strips of pastry about 3x8 inches long, place 3-4 tablespoons of spinach filling on the end of each strip, fold into a triangle then back and forth until the filling is completely enclosed and the package has retained its triangle shape, complete all just this way until all of the filling is used up. Bake for approximately 15-18 minutes, or until the pastry has achieved a golden brown color and pastry pies are puffed up.
Thursday, 10 March 2016
Elegant but Easy Onion Tart
I know, I've made lots of onion tarts but this one is really delicious, elegant but easy! If you have 4" tart tins that makes it better, but you can make it into a 9" tart then serve in slices.

 Convection Bake-Oven 390 degrees
Tart Shell
1-1/4 cup all purpose flour
Pinch of salt
1/2 cup unsalted butter, cut into small bits
3-4 tablespoons icy cold water
In food processor, add flour, salt and butter, pulse until all butter is incorporated, (mixture will look like small bits of barley), while pulsing the machine, add water until mixture starts to line the sides of the processor bowl. Turn contents of processor bowl out to a piece of plastic wrap, gather the loose bits and pat into a disc, wrap it tightly, then refridgerate for about 30 minutes.
Filling
2-3 tablespoons olive oil
1/2 tablespoon butter
3-1/2 sweet or red onions, halved and sliced thinly
3-4 cloves of garlic
Pinch salt and pepper
3 tablespoons balsamic vinegar
In a large sauté pan, heat oil and butter,over medium high heat, once butter is melted, add the onions, sauté until soft, add the garlic, salt and pepper, sauté until lightly golden and soft, add the balsamic vinegar, stir well, turn heat off, let cool.
2 eggs
1/2 cup cream cheese
1 cup Parmesan cheese, grated
Pinch salt and pepper
5 slices cooked til crisp bacon, crumbled
In a separate bowl, whip together eggs, cream cheese, when mixture becomes smooth, add the Parmesan cheese, salt and pepper, stir in well, then add the crumbled bacon, set aside.
Assembly
Take the pastry disc from the fridge, cut into 4 pieces, one piece for each tart tin, press dough with fingers til it covers each of the tart tins and around the edges, prick the dough all over with a fork, cover each lightly with foil, bake for 12-15 minutes at 390 degrees F, remove from oven, remove the foil, fill each tart with the cheese and bacon mixture, then cover each tart with the balsamic onion mixture, bake for 15 minutes until cheese is bubbly and tart is golden brown.
Serve with a green salad, for lunch or for dinner with a bit of roast chicken and haricot vert.
Thursday, 7 January 2016
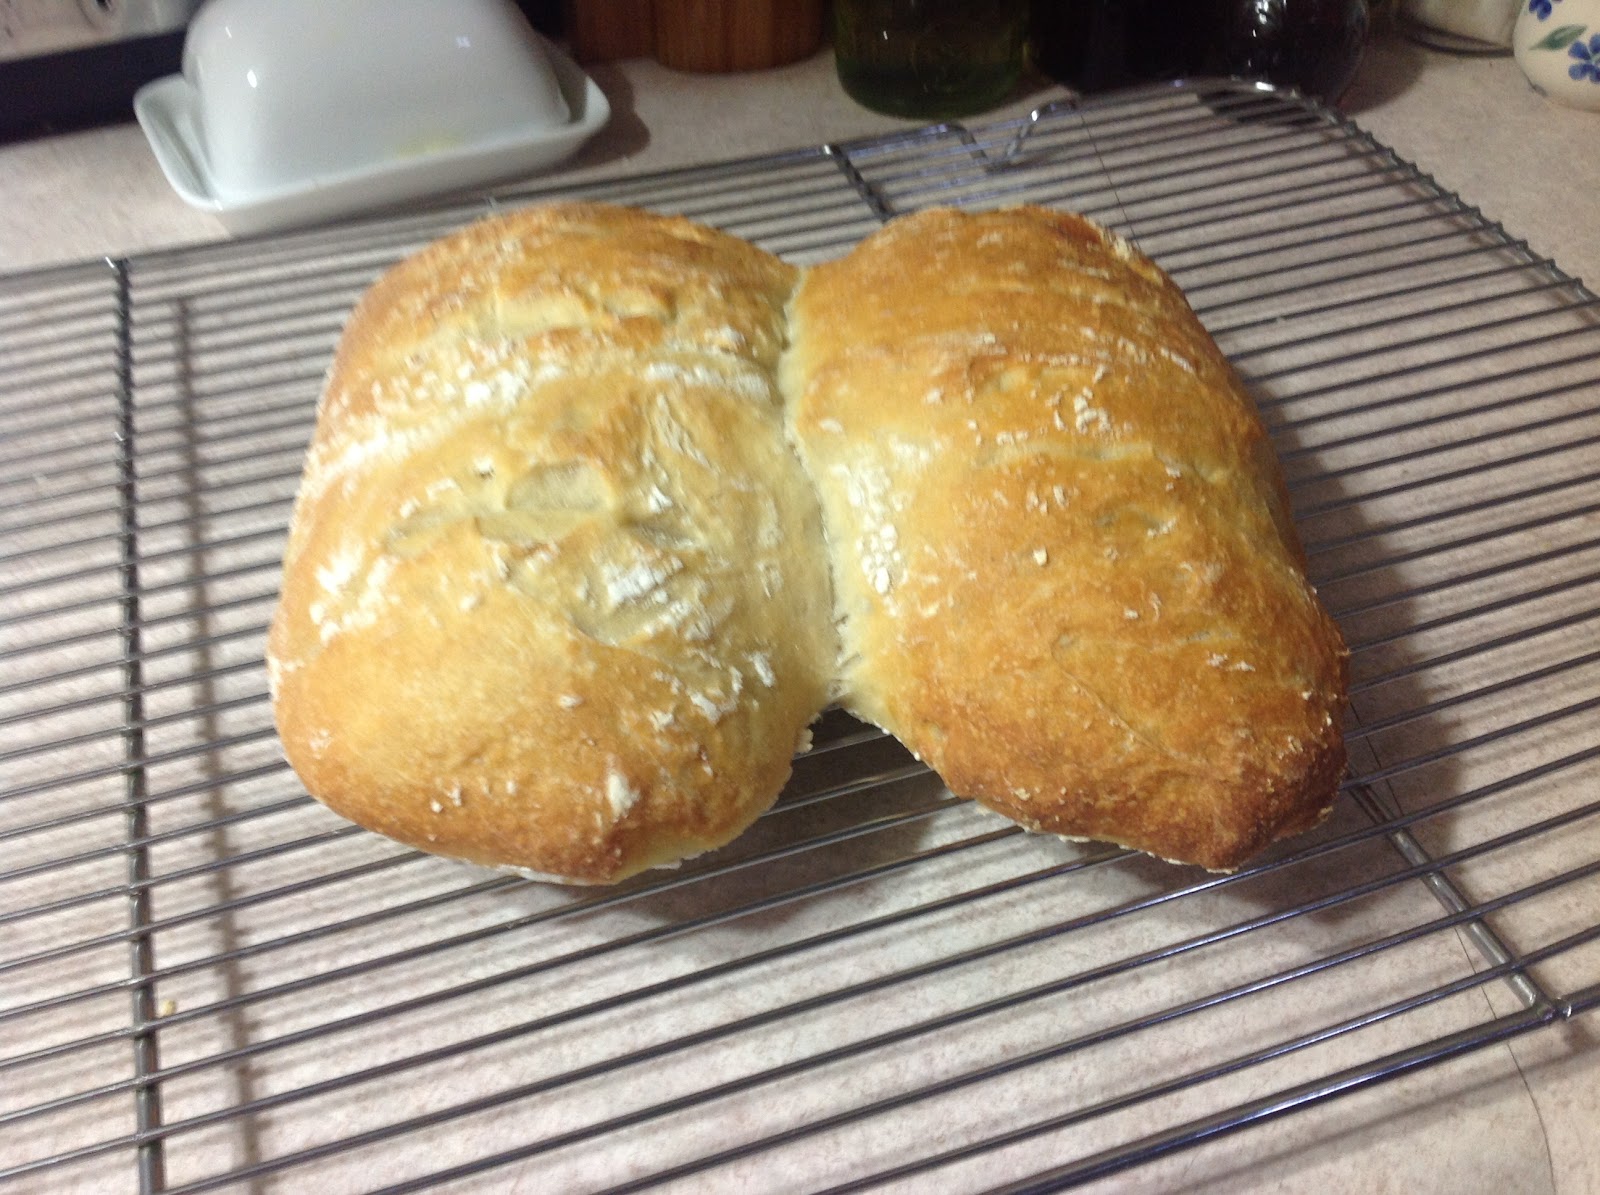
Best No Knead Crusty Bread
I have always loved making bread, at one time I made bread 2-3 times a week, loved the process, the flavour, no preservatives....the heavenly smell wafting through the house......... The best bread book I ever found was called Local Breads, by Daniel Leader, there were all types of bread recipes from different countries,and it was interesting, but was not for beginners, per se, but you could follow along the easier bread recipes and come up with a good product,all it depended on was your previous experience with bread baking. Daniel Leader is a whiz at making bread starter/poolish, then incorporating it into your recipe without additional yeast....You just had to know how to read between the lines in order to make a good bread....too complicated! and too much time to make 1 glorious loaf of bread!
So, I have this recipe that is virtually fool proof, makes you look like an expert at bread making in your own kitchen! it is really very easy.
 I have found that a good kitchen scale is ideal for use while measuring out baking ingredients, but if you don't have a scale, I have included the cup measurements.
32 ounces or 6-1/2 cups scooped and leveled bread flour, (if you sprinkle the flour into the cup then level it add 1 more cup)
1 tablespoon salt
1-1/2 tablespoon bakers yeast (watch the best before date)
3 cups 105 degrees water (slightly warmer than luke warm, but not burning your hand hot)
2 tablespoons extra virgin olive oil (to coat the bowl/container used for raising the dough)
Weigh or measure the bread flour, put it in a 6 quart mixing bowl, add the salt, and the yeast, whisk the dry ingredient all together, then make a well in the center, add the water. With the straight end of a wooden spoon, mix the flour mixture with the hot water until the dough comes together, you can use your hands if you prefer, or use your stand mixer, just mix it for 60 seconds only. Then when the dough has formed around the dough hook, or the wooden spoon, let it rest for 5 minutes, oil the bottom and sides of a large container with the extra virgin olive oil, then throw the bread dough into it, cover and let rise for two hours. After this, set the container into the fridge for at least 2 hours up to 7 days. (If you are short on time, just put the container of bread dough into the fridge for up to 7 days).
When you are ready to bake,preheat oven to 450 degrees F
1) put another sheet pan on the lower rack to let it heat up- this is the pan you add the water too to create steam for your bread, making it crusty and tender at the same time)
2) sprinkle the dough in the large container from the fridge with a bit of flour, oil your hands, tear off a chunk of dough about the size of a grapefruit,
3) form it into a round loaf, or a long ciabatta style loaf, set it on a sheet pan covered with parchment paper,
4) cover with plastic wrap loosely, then let it come to room temperature and rise-about 90-120 minutes.
5) Make long cuts in the top of your loaf, I use a kitchen scissors, it's easier than a sharp knife, but if you have a bread razor, that is ideal! (this is so it can expand with ease (otherwise it will retard the natural expansion of the loaf,and you will get a dense hard bread)
6) put the sheet pan holding your bread loaf in the oven, then add a cup of water to the other sheet pan on the lowest oven rack, quickly close the oven door
7) Bake in a 450 degree F oven for about 25 minutes, check that the bread is browning evenly, rotate the pan halfway through the baking period for even browning, take bread out when it is golden brown and it sounds hollow when tapped with your finger.
8) cool on rack for at least 15 minute before tearing in to eat this wonderful delicious loaf!
You will have enough dough to make at least 4 ciabatta loaves, or 6 buns and 2 loaves. The longer the dough stays in the fridge the more it will ferment making a great sour dough bread after a few days, remember to sprinkle the remaining dough with flour every couple of days to feed the yeast, then be sure to bake the remaining dough by the end of the week or 7 day period.
So, I have this recipe that is virtually fool proof, makes you look like an expert at bread making in your own kitchen! it is really very easy.
32 ounces or 6-1/2 cups scooped and leveled bread flour, (if you sprinkle the flour into the cup then level it add 1 more cup)
1 tablespoon salt
1-1/2 tablespoon bakers yeast (watch the best before date)
3 cups 105 degrees water (slightly warmer than luke warm, but not burning your hand hot)
2 tablespoons extra virgin olive oil (to coat the bowl/container used for raising the dough)
Weigh or measure the bread flour, put it in a 6 quart mixing bowl, add the salt, and the yeast, whisk the dry ingredient all together, then make a well in the center, add the water. With the straight end of a wooden spoon, mix the flour mixture with the hot water until the dough comes together, you can use your hands if you prefer, or use your stand mixer, just mix it for 60 seconds only. Then when the dough has formed around the dough hook, or the wooden spoon, let it rest for 5 minutes, oil the bottom and sides of a large container with the extra virgin olive oil, then throw the bread dough into it, cover and let rise for two hours. After this, set the container into the fridge for at least 2 hours up to 7 days. (If you are short on time, just put the container of bread dough into the fridge for up to 7 days).
When you are ready to bake,preheat oven to 450 degrees F
1) put another sheet pan on the lower rack to let it heat up- this is the pan you add the water too to create steam for your bread, making it crusty and tender at the same time)
2) sprinkle the dough in the large container from the fridge with a bit of flour, oil your hands, tear off a chunk of dough about the size of a grapefruit,
3) form it into a round loaf, or a long ciabatta style loaf, set it on a sheet pan covered with parchment paper,
4) cover with plastic wrap loosely, then let it come to room temperature and rise-about 90-120 minutes.
5) Make long cuts in the top of your loaf, I use a kitchen scissors, it's easier than a sharp knife, but if you have a bread razor, that is ideal! (this is so it can expand with ease (otherwise it will retard the natural expansion of the loaf,and you will get a dense hard bread)
6) put the sheet pan holding your bread loaf in the oven, then add a cup of water to the other sheet pan on the lowest oven rack, quickly close the oven door
7) Bake in a 450 degree F oven for about 25 minutes, check that the bread is browning evenly, rotate the pan halfway through the baking period for even browning, take bread out when it is golden brown and it sounds hollow when tapped with your finger.
8) cool on rack for at least 15 minute before tearing in to eat this wonderful delicious loaf!
You will have enough dough to make at least 4 ciabatta loaves, or 6 buns and 2 loaves. The longer the dough stays in the fridge the more it will ferment making a great sour dough bread after a few days, remember to sprinkle the remaining dough with flour every couple of days to feed the yeast, then be sure to bake the remaining dough by the end of the week or 7 day period.
Subscribe to:
Posts (Atom)